Recently I had an opportunity to setup TP-Link TD-W8968
which is a ADSL modem cum WiFi router. This article is for a novice who is venturing into modem/router set-ups for the first time.This post is for MTNL/BSNL on ADSL+ connections.
Connecting
the Modem Router: See Fig 1.
1) Connect the
ADSL Line.
You can use a separate splitter. External splitter can
divide the data and voice, and then you can access the Internet and make calls
at the same time. The external splitter has three ports:
• LINE: Connect to the wall jack
• PHONE: Connect to the phone sets
• MODEM: Connect to the ADSL port of the modem.
Plug one end of the ADSL cable into the ADSL port on the
rear panel of the unit. Connect the other end to the MODEM port of the external
splitter.
2) Connect the
Ethernet cable. Attach one end of a network cable to your computer’s Ethernet
port or a regular hub/switch port, and the other end to the LAN port on the
modem router.
3) Attach the
power adapter. Connect the power adapter to the power connector on the rear of
the unit and plug in the adapter to a electrical point. Switch on the unit
4) Power on the
computer and LAN devices.

Next step is to configure your computers IP address. (For
Win 7)
Click on the Start button->Control Panel->Network
& Sharing centre. Click on ‘Change Adapter Settings’ (In the left Panel)
Fig.
2
Right click on Local Area
Connection->;Properties & Double click on ‘Internet Protocol Version
4’->In the General Tab-& Select ‘Obtain an IP automatically’ then select ‘Use the following DNS Addresses’
59.185.3.10 & 59.185.3.12
You are free to use any DNS addresses eg: Open DNS, Google DNS Comodo DNS.
You are free to use any DNS addresses eg: Open DNS, Google DNS Comodo DNS.
Open DNS 208.67.222.222 & 208.67.220.220 & 208.67.220.222
& 208.67.222.220
or Google DNS 8.8.8.8 & 8.8.4.4
Comodo DNS. 156.154.70.22 & 156.154.71.22
Fig.
3

You can run the Ping command in the command prompt to
verify the network connection.
Please click the ‘Start’ button on your desktop, in the
search field type ‘run’ & in that window type ‘ping 192.168.1.1’, and then
press ‘Enter’.
If the result displayed is similar to the screen below,
the connection between your PC and the modem router has been established.
Fig.
4

If in the same screen you get a display of ‘Timed Out’ it
means that you’re PC has not connected to the unit.
Now for setting up this model.
The Web-based utility can be used on any Windows,
Macintosh or UNIX OS with a Web browser, such as Microsoft Internet Explorer,
Mozilla Firefox or Apple Safari. My setup is in the Windows environment & using
Mozilla Firefox.
1) Open
Firefox & type 192.168.1.1 in the address bar & pres ‘Enter’ Fig.5 (Below)
2) A
login window will appear, as seen below. Enter ‘admin’ for the User Name and
Password, both in lower case letters. Then click the ‘OK’ button or press the
Enter key.

If the above screen does not
pop up, it means that your Web-browser has been set to a proxy. Go to
Start-> Control Panel->Network & Sharing Center→Internet
Options→Connections→LAN Settings, in the screen that appears, cancel the Using
Proxy checkbox, and click OK to finish it.
3) After
successful login we will see the fifteen main menus (See below) on the left of the
Web-based utility. On the right, there are the corresponding explanations and
instructions.

4) If
we click on ‘Status’ we shall see the fig as seen below in Fig 7. below

5) We
click on ‘Quick Setup’. Here the modem router supports three modes: ADSL Modem
Router Mode, 3G Router Mode and Wireless Router Mode. Choose your desired mode
and then click Next. See Fig 8 below.

ADSL
Modem Router Mode: In this mode, the device enables multi-users
to share Internet via ADSL using its ADSL port and share it via wireless at
300Mbps wireless 802.11n speeds.
3G
Router Mode: In this mode, the device allows multi-users
to share a 3G mobile broadband connection via wired or wireless connection.
Wireless
Router Mode: In this mode, the device enables
multi-users to share Internet via Ethernet WAN (EWAN) using its interchangeable
LAN/WAN port and share it via wireless at 300Mbps wireless 802.11n speeds.
6) We
select ‘ADSL Modem Router Mode’. Change the VPI = 0 & VCI = 32 for MTNL
Mumbai (these values which are used to define a unique path for your connection).
Click 'Next'.
Fig
9.

These VCI & VPI I have mentioned above is basically for MTNL for the other ISP’s in India.
Connection Name
|
VPI
|
VCI
|
MTNL
|
0
|
32
|
BSNL
|
0
|
35
|
Airtel
|
1
|
32
|
VSNL
|
0
|
33
|
We then come to the Fig 10. as seen below

1) Here
we select PPPoE & then click ‘Next’. After that.
2) We
come to the ‘PPPoE’ window and we come to the Fig 11 as seen below.

3) The
‘Username’ is one’s telephone number. ‘Password’ is the CA number given on
one’s tel bill enter password again & click ‘Next’.
7) Here
we come to the 3G window (3G backup function is disabled by default.). Click
Next to skip to the next step
4) And we come to Fig 12. (Below)

Wireless is enabled.
Wireless Network Name. A meaningful name is given, avoid
personal name/surnames, address etc
Region. Is changed to India.
Channel is left at ‘auto’.
Mode. Select relevant mode (more on this later.
Security. ‘Disable Wireless Security’. We shall be
changing it later.
Click on ‘Next’. We
to come to confirmation page Fig 13. (Below)

Click on ‘Save’ & we come to the Quick Setup Complete page Fig 14.

Click on ‘Finish’
What we have done so far is thru the ‘Quick Setup’ there
are some more entries to be done to fine tune our setup.
In Fig 15 below
Click on ‘Network’ then ‘WAN Settings’

Then click on WAN Settings

and you will see the WAN Port Information Table where we
Click on ‘ADD’, we come to the following fig as seen below Fig 17

VPI & VCI entries have already been done & should
read as 0/32
Connection Type should be PPPoE (MTNL Mumbai)
User Name & Password have already been entered.
Connection Mode should be ‘Always On’
Click on the two ‘Advance’ buttons on the right side of
the page & we get the following Fig
18
Encapsulation Mode & ATM DoS Type SHOULD NOT BE changed
Authentication Method can be left as AUTO_AUTH which is
Default.
Enable IPv4: Check this box to enable IPv4.
Enable IPv6: Do not enable IPv6 for the time being. Maybe
when MTNL starts this service it can be enabled.
Default Gateway: Select a WAN connection from the
drop-down list as the IPv4 default gateway.

MTU (bytes): Maximum Transmission Unit Size can be set to
1492, 1500 is Default.
Enable IGMP Proxy. The default value is disabled. Keep it
that way.
Click on ‘Save’.
Choose Network ->LAN Settings” menu, and you will see
the LAN screen shown in Fig 19.

DHCP Server Enable.
Start IP Address. The default Start IP Address is
192.168.1.100
End IP Address. The default End IP Address is 192.168.1.254
Leased Time. The default is 1440 minutes
Gateway is 192.168.1.1
Primary DNS Server is 59.185.3.10
Secondary DNS Server is 59.185.3.12
Network->DSL
Settings

DSL Modulation Type: Select the DSL operation Modulation
Type which your DSL connection uses.
Annex Type: Select the DSL operation Annex Type which
your DSL connection uses. Click the ‘Save’ button to save your settings.
Wireless.
Click
“Wireless”, there are six sub menus to configure Wireless LAN settings.

Click Wireless ->;Basic Settings, you should see the
screen of Wireless Basic Settings shown below. The basic settings for wireless
networking are set on this screen.
If you remember we had enabled wireless, but disabled security.
As a recap

Wireless. Click Enable
SSID. Give a name to your wireless network (but not your
personal name or address)
Region. Select India from the drop down list box. Channel
& Channel Width leave it as Auto.
Mode. Select the mode of your choice (depending on your
type of gadgets)
11b only: Select if all of your wireless clients are
802.11b.
11g only: Select if all of your wireless clients are
802.11g.
11n only: Select only if all of your wireless clients are
802.11n.
11bg mixed: Select if you are using both 802.11b and
802.11g wireless clients.
11bgn mixed: Select if you are using a mix of 802.11b,
11g, and 11n wireless clients.
(If 11b only, 11g only, or 11bg mixed is selected in the
Mode field, the Channel Width selecting field will turn grey and the value will
become 20M, which is unable to be changed.)
Enable SSID Broadcast checkbox,
Click on Save.
Now check if you can connect a wireless device.
Wireless
Security. Click on Wireless->Wireless Security, you can
configure the security settings of your wireless network.

WPA/WPA2 - Personal: should be selected.
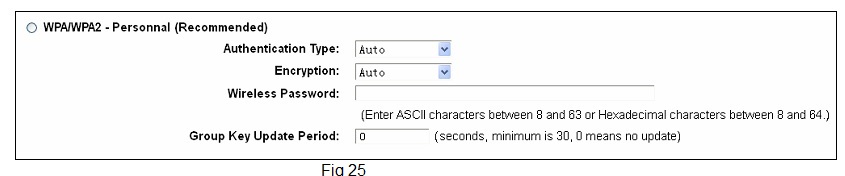
Authentication Type. Select WPA2 Personal.
Encryption. Select TKIP.
Wireless Password - You can enter ASCII characters
between 8 and 63 characters or 8 to 64 Hexadecimal characters.
Group Key Update Period. Enter 0 to disable the update.
For generating long random passwords you can use
https://www.grc.com/passwords.htm
https://secure.pctools.com/guides/password/
For generating long random passwords you can use
https://www.grc.com/passwords.htm
https://secure.pctools.com/guides/password/
Wireless
MAC Filtering.
Click on Wireless->MAC Filtering, you can control the
wireless access by configuring
Wireless MAC Filtering function, seen Fig 26.

Select ‘Allow the
stations specified by any enabled entries in the list to access’. What it
means that only those gadgets whose MAC address is mentioned & enabled will
get access to wifi from this router.
To Add a Wireless MAC Address filtering entry, click the
Add Newbutton. The following page will appear, seen in Fig 27

To add a MAC Address Filtering entry, follow these
instructions:
1. Enter the appropriate MAC Address into the MAC Address
field. The format of the MAC Address is XX:XX:XX:XX:XX:XX (X is any hexadecimal digit). For example:00:1D:0F:13:22:23.
2. Give a simple description for the wireless gadget in
the Description field. For example: Nokia E63.
3. Select Enabled or Disabled for this entry on the
Status drop-down list.
4. Click on the Save button to save this entry.
After this is done the last thing to be done is in the
menu on the left side click on System Tools->Time Settings.

To
set time manually:
1. Select your local time zone.
2. Enter the Date in Year/Month/Day format.
3. Enter the Time in Hour/Minute/Second format.
4. Click Save. or
To
set time automatically:
1. Select your local time zone.
2. Enter the address or domain of the NTP Server 1 or NTP
Server 2. (Some can be found at http://tf.nist.gov/tf-cgi/servers.cgi
&
http://support.microsoft.com/kb/262680
http://support.microsoft.com/kb/262680
3. Click on the Get GMT button to get system time from
Internet if you have connected to the Internet.
Configure
USB Ports
To configure the USB features? See http://www.tp-link.com/app/usb/?siteid=1
A few useful sites are mentioned below.
http://www.whatismyip.com/
http://downforeveryoneorjustme.com/
http://www.dslreports.com/tweaks
https://www.opendns.com/
http://speedtest.net/
http://pingtest.net/
http://airtel.in/speedcheck
http://www.whatismyip.com/
http://downforeveryoneorjustme.com/
http://www.dslreports.com/tweaks
https://www.opendns.com/
http://speedtest.net/
http://pingtest.net/
http://airtel.in/speedcheck
24 comments:
Comprehensive. With your tips even better than the original. Thanks a ton. :D :D
U live upto your name. Thanks
Wow Wow Wow !!!!
You should be hired by the manufacturer to write their installation instructions.
THANKS A LOT.
Have you succeeded in setting up IP6 for your ISP & is it working? If so can you post it at the TP-Link India forum http://forum.tp-link.com/forumdisplay.php?18-Wireless-ADSL2-Modem-Routers&s=caa4285d895d069b8e54a7f56f2d8dc5&&model=TD-W8968
Hi Socrates,
Very comprehensive and helpful. It helped me so very much. It is really required as the company installation guide manual does not give so much in detail and it skipped quite a few important things.
Hi Socrates,
great job my friend. What an excellent way of informing how to set up. Great job.
Thanks again very much.
Hi, this is a great work writing to connect for the wan part.
do you know how to connect to 3g alone without WAN or DSL.
Prashanth
hello! may i ask how do you set this up with an etisalat al shamil internet connection the one that uses a "PPPOE" injector modem
thanks so much!!!!!
This post is basically for MTNL/BSNL on ADSL+ connections. Sorry I don’t have any experience in any other.
It’s very strange as I connect many more than that & I don’t have any trouble. Are you using DHCP (I am ), just check you have not made any changes there. Start IP is 192.168.1.100 & End IP is 192.168.1.200
Also if you are using MAC filters, I hope you have added the MAC addresses of ALL devices.
If this does not sort out your problem then I suggest a factory reset & start from scratch. If that does not sort out the problem then I think you should contact the distributor & exchange it, if it’s in warranty.
Hi bro
Can u pls help me on this Recently I have bought tplink TD8968 version 4 my MTNL BROADBAND.after instalation specialy going thru your instructions for set up the was good the Internet is working. But just that there are frequent drop offs or disconnections.I am not a computer software wiz so please give some settings for fine tuning and specially to fix the problem of constant disconnections. Pls help
Pls reply to my problem coz MTNL aunties don't care a DAMN .the user interface of version 3 and version 4 is so very different have tried a lot but in vain.
My post is for the ver 3 but the fundas will be the same even if the screenshots are different. Check your ‘attenuation’ & ‘SNR’. SNR < 10 will give you DC. Disconnections usually means poor line quality which has to be rectified by the linesman. Remember that your tel line should come to your modem (via splitter) first then to your phone instrument else you can have DC everytime the phone rings or is picked up. When you make a complaint just say your are getting many disconnections (DC)
Thanks for your reply will get back to you ....if the problem remains.
I have set it in 3g router mode. Docomo datacard is also configured correctly & connected. wireless also configured and enabled in settings page. But wifi indicator never glows. status page shows disabled. I am using v1 hardware with 131226 build firmware. pls help resolve this
@Anonymous 5:53 PM, December 06, 2015 Sorry I have no experience of setting up for 3G mode
Hi Socrates
I have td 8968 now the issue is on the router the adsl light is solid green but I cannot access the Internet.the problem has recently started
I am using mtnl broadband mumbai.please can you help with this situation.
Hi Socrates
I have td 8968 now the issue is on the router the adsl light is solid green but I cannot access the Internet.the problem has recently started
I am using mtnl broadband mumbai.please can you help with this situation.
@2677d Were you making any changes in your modem? What do you mean by ‘cannot access the internet’ what type of error are you getting. Are you referring that you cannot access any site? If yes then check what your MTU is. Change it to 1492. If that does not work then reset & setup your modem again. Hope this helps
Hi socrates..
I bought latest td 8968 version4. can i able to bridge ipv6 address. many are saying that in 8968 you cannot bridge bcoz of ipv6 ,where you can in 8960.
@Anonymous 5:09 PM, May 19, 2016 I have never tried my hand at IP6 as my ISP has not yet bothered to implement it
Hello! Any idea how to set it up only as modem? i have external router now (Netgear ac1200 R6220) and i want either to use TP-Link TD-W8968 only as modem (dont transmit wifi) or i want to have TP-Link TD-W8968 connected via adsl to net and setup netgear on other floor (no wires) please help someone
Looking for Tp-link Australia call on 1800987893 , visit on:
Tp-link Australia
Tp-link distributors
Post a Comment