Friday, December 03, 2010
Changing your Firefox default keyword search
Of late I have been bugged by some software's making changes to my default search engine especially when I type the keyword in the address bar. To restore back to your original, open the about:config page and pull up the entry name keyword.URL, it can be modified to change the search behavior of the address bar. Mine is Google so to use google search change it to, http://www.google.com/search?hl=en&q=, and now all your searches go through google. :D
Sunday, October 10, 2010
Email Merge thru Thunderbird
This is a tutorial to use the email merge thru Thunderbird 3.1.4 or later (Can be found here http://www.mozillamessaging.com/en-US/thunderbird/ ). I have also used the add-on called 'MailMerge'.
First install the latest ver of Thunderbird & configure the email a/c. (I have not included the instructions here). Then install the add-on found here -> https://addons.mozilla.org/en-US/thunderbird/addon/47144/

'MailMerge' is a Thunderbird extension designed by Alexander Bergmann. The Mail Merge extension is compatible with the latest Thunderbird 3.0.* releases, and is cross-platform. It supports two features, dubbed Mass Mail and Personal Mail.
'Mass Mail' allows you to create a draft email, put your intended recipients in the To:, CC:, and BCC: fields, then automatically split the draft into a set of identical copies with one addressed to each recipient. This is all done without special preparation beforehand; the extension adds a button labeled Mass Mail to the toolbar; you compose your mail as usual, then click on Mass Mail to perform the split.
The 'Personal Mail' feature is far more like a traditional paper mail-merge. You create a message template, with control codes in place of the fields you wish to include, then link the template to a comma-separated-value file (CSV) populated with your intended recipients. The control characters use double braces, and you can define any fields you want — just place their field names in the first line of the CSV. You will probably only use the recipient’s name and email address, so your template might just include {{name}} and {{email_address}}, but you could include other information from your address book in the body of the message if you need to.
Close Thunderbird for now.
Now lets get down to preparing the database containing the fields that you will use in the email that is going to be sent to 'X' number of people. As you will see in the fig. Below I have made columns with the title
'Salutations' which will contain 'Dear', 'Mr', 'Ms', 'Maam', 'Pachi' etc

'Fname' will contain the First Name of the recipient.
'Lname' will contain the Last Name of the recipient.
'EmailID' will contain the Email ID of the recipient.
After giving the column headings save the file as a .CSV file (Comma Seperated Values). Now fill in the details of all the recipients. This file can be opened in Microsoft Office or in OpenOffice. You can add other details if required taking care to give a column name which is indicative of its contents.
Now open Thunderbird click on 'Write' as seen below

In this window as seen below I have specified the column headings enclosed in double braces. For the recipients its {{EmailID}}. ie: In the 'To' type {{EmailID}}When the email is sent the email ids from this column in your database will occupy this space & that is what the recipients will see at his end.
Now you can type out the contents of the email & can be addressed as seen in the figure below, ofcourse you can format it in anyway. Some examples are
Eg 1:
To,
Dear {{Fname}} {{Salutations}} which will appear as
To,
Dear Shailesh Maam to the recipient
Eg 2:
To,
Dear {{Fname}} {{Lname}} which will appear as
To,
Dear Shailesh Parab to the recipient
You can try out any permutation and combination but remember that if you have a column in your database, you can place its contents in your email at a location of your choice.
Now to send the email click on 'File' in the Menu bar (seen below) & then click on 'Personal Mail'

you will get a window which looks like this (see below)

In this window you will have to click on 'Browse' push button to select the file which contains your database. If your database is small then leave other entries as you see them & then click on 'Ok'. But if your database is large I would suggest that you specify the 'Start' & 'Stop' containing the record numbers to limit the output of emails being sent at any given time.
One drawback of this add on, ver 1.3.1 working with Thunderbird ver 3.1.4, is it does not allow embedded pictures to be transmitted. Hopefully this will be rectified in future versions.
Saturday, October 09, 2010
Setup instructions for MyPhoneExplorer for Samsung Galaxy S
Samsung Galaxy S is also called i9000 on the Samsung website http://www.samsung.com/in/consumer/mobile-phone/mobile-phone/touch-phone/GT-I9000HKAINU/index.idx?pagetype=prd_detail&returnurl=
If you start MyPhoneExplorer ver 1.8.0 & click on ‘File’->’Settings’->’Phone with Google Andriod OS’ & then take the mouse pointer to ‘Sample’ next to it you will see that Samsung i9000 is mentioned in it which is the nomenclature for Samsumg Galaxy S. so this phone is compatible with this s/w. Also mentioned here http://www.fjsoft.at/forum/viewtopic.php?t=8965&sid=bd29b3f5949597ab220c86627645474a
You have to remember two things here in this setup
1) If you want to connect via cable or by Bluetooth the settings will be different & you will have to reconfigure separately for each type of connection.
2) If you are connecting thru USB cable AND you happen to connect thru different USB port then your configuration will change & you will have to come to this section of ‘Setting’ to click again on the push button ‘Search for Device’.
Before starting I suggest that backups be made of important data on your phone also remember that 'Andriod' is still 'Work-In-Progress' . :) Now lets get to the setup. Close the s/w & connect the USB cable (or bluetooth dongle) & then start the s/w, you should see some balloons popping up in your task bar, let that process go on.
Click on ‘File’->’Settings’ then click on 'Connection' (seen in the left pane). (See below).
Click on ’Phone with Google Andriod OS’.
‘OBEX packet size’ should be ‘Autodetect’.
Select ‘Write log file’.
Remember that the COM port number & Baud rate number seen in the figure below maybe different from what you see in the s/w on your machine, do not change it.

At this point DO NOT CLICK ON 'Search for Device'. That will be done last when all selections are done. (Page 6)
Now make the selection as seen in the following picture.
Next click on ‘Startup’ in the left pane & the following window will be seen.

Next click on ‘Appearance’ in the left pane & the following window will be seen. Here you can change the 'Font' & 'First Day of the Week'

Next click on ‘Behaviour' in the left pane & the following window will be seen.

Next click on ‘Sync’ in the left pane & the following window will be seen.

As seen the picture immediately above 'Only MyPhoneExplorer' is selected, as syncronisation is being inside this s/w itself in case you want to sync with another s/w like MS Outlook, MS Outlook Express, Thunderbird, Windows Live Mail etc (depending on whether any of the above mentioned is installed on your computer), you will have to make the appropiate selection in 'Contacts', 'Calender', 'Notes' seen in picture above. Also the correct 'Sync protocol' should be selected. 'SyncML' is usually the universal standard but you might have to experiment here as the 'User Guide' is silent on this maybe the forum can help !!!
Next click on ‘Multi-Sync’ in the left pane & the following window will be seen.

Next click on ‘Advanced 1’ in the left pane & the following window will be seen.

Next click on ‘Advanced 2’ in the left pane & the following window will be seen. Here you can change the location of 'Photo Sync' folder (where photos are stored) & location of your database. Its preferable to keep them on a drive other than C:\ where the computer OS is stored.

After making all the selections as seen in the figures above are done, lets go back to 'Connection' again.

Click on ‘Search for device’. It should usually detect your phone without any problems, IN CASE it does not then you should play around with the ‘COM port’ selection depending on which USB port you have connected to & ‘baud rate’ to get it going. If it still does not, then post your problem on the forum (link given below) to get an answer from the developer.
Hope this helps :)
Forum for this s/w & can be useful in future for further reading about any bugs, shortcomings etc. They can be directly communicated to the developer for remedies.
http://www.fjsoft.at/forum/viewforum.php?f=6&sid=31449d2cff846bbedbf6d47708a2b32b
After this done I suggest you take a 'Backup' by clicking on 'Extras' in the Menu bar & then clicking on 'Create Backup' before exploring any further :)
Saturday, July 17, 2010
How to change password of MTNL Broadband Account
The Broadband User account consists of a Username and Password. This Username and Password is used for connecting to MTNL Broadband Network.
Customers are advised to change the password soon after the connection is set-up.
For your Broadband Account your Telephone No. ( Telephone No. on which the Broadband Connection has been provided) shall be the Username.
The CA number ( Consumer Account Number) of this telephone shall be the initial password. The CA Number is available on the telephone bill.
The change of password is required to be done at two places –
- one on the MTNL Server and the
- other on the MTNL Broadband Modem set-up.
IMP: When you are changing the password as given in this post,
please disable firewall/anti virus s/w as these have been known to interfere
with the saving of the password in this make/model of modem.
First change the password on MTNL server and then on the Modem as described below-
Follow the procedure given below to change the password -
Connect to Internet and open the webpage, http://register.mtnl.net.in

-->
Use your username ( Telephone No.) and the password ( your CA number) to login to your self-care page. (For th first time)
Your account details shall be displayed.
 Click on the link - 'Change service passwords'. The following window shall be displayed.
  In 'Service' select 'ADSL-'Your Tel No.'
Type new password in 'New Password' & again in 'Confirm New Password' and click on 'Change Password'. Successful acceptance of the new password shall be displayed on the screen.
Note - Also, register a secret question and answer from this page by selecting the link – 'Change Secret Question info'. This shall be useful to reset the password in case you forget the same. The password can be reset by using the Link on webpage –
http://register.mtnl.net.in . Customers are advised to register the secret question and answer.
After the password has been successfully changed on the MTNL Server, follow the procedure given below to change the password on your Broadband Modem.
The screen shots given below are for the modem D-Link DSL 502T modem.
Open your browser & type the following address, http://192.168.1.1 . This is your Modem's User interface. Please be careful while carrying out changes in the Modem as it may effect overall working of your connection. Do not change any other settings unless advised.
Type “admin” as username and “admin” as password. Then a new page will appear as shown below

This is the web interface of Broadband Modem.
Click on 'WAN' option. Under the heading, PPPoE/PPPoA, your telephone number is visible as your 'username'.
Type your new password carefully. This should be same as the one entered on the MTNL Server. This password and the password on the MTNL Server are matched before the connection is established.
Click the 'Apply' button at the bottom of page.
After this, click on 'Tools' option and select 'System' option on that page. The following window shall appear
 Click on 'Save & Reboot' button to save your new password in the modem.
Verify by checking the status of connection by clicking on the Status Tab on the Modem User Interface. It should show connected.
This completes the process of changing your Broadband User Account Password.
Wednesday, June 16, 2010
Updating a laptop with Win XP to support WPA2 WiFi security
Recently a friend asked me to help him create a home WiFi network to connect his laptop with Win XP SP2 to the Internet. He was not sure if his laptop could support WPA2 PSK. Since his laptop was an Acer Travelmate 4152 NLCi, I went to the Acer website & had to search if it did. I finally found out that his laptop had a Intel(R) PRO/Wireless 2200BG Network Connection adapter which worked with the 802.11b or 802.11g wireless standard.
Wi-Fi Protected Access version 2 (WPA2) is the latest version of security for wireless networks. It's more secure than Wired Equivalent Privacy (WEP) and easy to set up using the features built into Microsoft Windows XP Service Pack 2 (SP2).
In addition to the update for Windows XP SP2, you need two components:
1. A router or access point/router that supports WPA2-Personal
2. A wireless card with firmware and drivers that supports WPA2-Personal on your laptop its best to update the drivers of your laptop wireless card.
Also the patch Windows XP Hot fix KB893357 is required to update Win XP SP2 to support WPA2 PSK. This patch can be found at http://www.microsoft.com/downloads/details.aspx?displaylang=en&FamilyID=662bb74d-e7c1-48d6-95ee-1459234f4483
Or
http://www.pcworld.com/downloads/file/fid,30721-order,4/description.html
for details on WPA2 check out
http://www.microsoft.com/windowsxp/using/networking/security/wireless.mspx
http://www.microsoft.com/windowsxp/using/security/expert/bowman_wirelesssecurity.mspx
Tuesday, June 15, 2010
How to configure Linksys WRT 120N wireless router
Recently a friend asked me to help him create a home WiFi network to
connect his laptop with Win XP SP2 to the Internet. He was not sure if his laptop could support WPA2 PSK. Since his laptop was an Acer Travelmate 4152 NLCi, I went to the Acer website & had to search if it did. I finally found out that his laptop had a Intel(R) PRO/Wireless 2200BG Network.My friend had bought a Linksys WRT120N WiFi router for his home use, after setting up his network I was shocked to find that his laptop which connected so easily to the internet, at my place thru a Linksys WRT54G router was unable to do so thru this new router. And the strange thing was that another (office) laptop was able to do so !!!! After trawling the Internet for info on this problem I found the solution, that the firmware on the router could be the culprit. I noticed that the firmware ver on the WiFi router was ver 1.0 & that there had been FOUR ver updates till the time of purchase of the router (shows what old junk Croma is selling). The firmware on the router would have to be updated to the current ver which is 1.0.04 dated 15th Oct, 2009 & is 1.19MB in size the release notes state that it has a compatibility issue with the Intel(R) PRO/Wireless 2200BG Network card which has been resolved.
‘Product: WRT120N v1Classification: Firmware Release HistoryRelease Date: Oct 15, 2009
Last Firmware Version: 1.0.04_____________________________________________________________________
General Notes: - Disconnect all wireless clients from the router during the upgrade process. Make sure no wireless clients attempt to associate with the router until the upgrade process is complete.
Firmware 1.0.04 (Build 02)- Resolve connectivity issue with Intel Centrino 2200BG - Resolve issue with Home Network Defender trial period gets activated as soon as the router is connected to the Internet’
Setting up the Linksys WRT 120N is the same as Linksys WRT54G http://socrates0.blogspot.com/2007/12/how-to-configure-linksys-wrt54g.html,
except that in the tab ‘Wireless’ -> ‘Wireless Network Mode’. From this drop-down menu, you can select the wireless standards running on your network. If you have Wireless-N, Wireless-G, and Wireless-B devices in your network, keep the default, Mixed. If you have only
Wireless-G and Wireless-B devices in your network, select BG-Mixed. If you have only Wireless-N devices, select Wireless-N Only. If you have only Wireless-G devices,
select Wireless-G Only. If you have only Wireless-B devices, select Wireless-B Only. If you do not have any wireless devices in your network, select Disabled.
Else everything remains the same.
A few other useful sites are mentioned below.
http://www.whatismyip.com
http://downforeveryoneorjustme.com
http://www.dslreports.com/tweaks
https://www.opendns.com
http://speedtest.net
http://pingtest.net
http://airtel.in/speedcheck
connect his laptop with Win XP SP2 to the Internet. He was not sure if his laptop could support WPA2 PSK. Since his laptop was an Acer Travelmate 4152 NLCi, I went to the Acer website & had to search if it did. I finally found out that his laptop had a Intel(R) PRO/Wireless 2200BG Network.My friend had bought a Linksys WRT120N WiFi router for his home use, after setting up his network I was shocked to find that his laptop which connected so easily to the internet, at my place thru a Linksys WRT54G router was unable to do so thru this new router. And the strange thing was that another (office) laptop was able to do so !!!! After trawling the Internet for info on this problem I found the solution, that the firmware on the router could be the culprit. I noticed that the firmware ver on the WiFi router was ver 1.0 & that there had been FOUR ver updates till the time of purchase of the router (shows what old junk Croma is selling). The firmware on the router would have to be updated to the current ver which is 1.0.04 dated 15th Oct, 2009 & is 1.19MB in size the release notes state that it has a compatibility issue with the Intel(R) PRO/Wireless 2200BG Network card which has been resolved.
‘Product: WRT120N v1Classification: Firmware Release HistoryRelease Date: Oct 15, 2009
Last Firmware Version: 1.0.04_____________________________________________________________________
General Notes: - Disconnect all wireless clients from the router during the upgrade process. Make sure no wireless clients attempt to associate with the router until the upgrade process is complete.
Firmware 1.0.04 (Build 02)- Resolve connectivity issue with Intel Centrino 2200BG - Resolve issue with Home Network Defender trial period gets activated as soon as the router is connected to the Internet’
Setting up the Linksys WRT 120N is the same as Linksys WRT54G http://socrates0.blogspot.com/2007/12/how-to-configure-linksys-wrt54g.html,
except that in the tab ‘Wireless’ -> ‘Wireless Network Mode’. From this drop-down menu, you can select the wireless standards running on your network. If you have Wireless-N, Wireless-G, and Wireless-B devices in your network, keep the default, Mixed. If you have only
Wireless-G and Wireless-B devices in your network, select BG-Mixed. If you have only Wireless-N devices, select Wireless-N Only. If you have only Wireless-G devices,
select Wireless-G Only. If you have only Wireless-B devices, select Wireless-B Only. If you do not have any wireless devices in your network, select Disabled.
Channel Width For best performance in a Wireless-N
network, select 40MHz only. For Wireless-G and Wireless-B
networking only, keep the default, 20MHz only. If you
are not sure which option to use, select Auto (20MHz or
40MHz).
Else everything remains the same.
Recently I came across two sites which generate random passwords
https://www.grc.com/passwords.htm
https://secure.pctools.com/guides/password/
The first is an online generator whereas the second is a s/w to be installed on your machine to do the needful. When you use a password 63 or 64 characters long copy paste it in your WiFi router then save the password in ‘Notepad’, then transfer this password to a pendrive & paste it in your laptops.
A few other useful sites are mentioned below.
http://www.whatismyip.com
http://downforeveryoneorjustme.com
http://www.dslreports.com/tweaks
https://www.opendns.com
http://speedtest.net
http://pingtest.net
http://airtel.in/speedcheck
Monday, May 31, 2010
How to enter DNS setting on your computer

This article was written for a relative who uses an Acer laptop & needed help on manually entering DNS settings.The task bar will have one/two icons like the one pointed out above, one will be for the LAN wire & the second will be for the WiFi. The method shown here for entering DNS settings is valid for both.
When you double click on this icon shown above you will come to a window, which should look like this
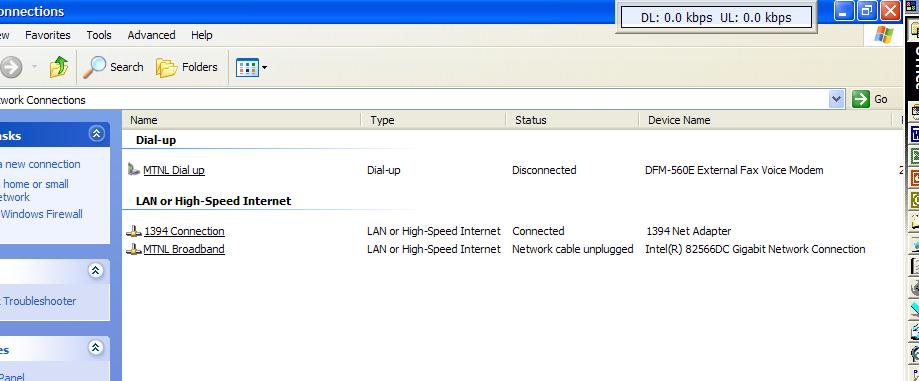 We have to focus on the last entry, in my case which I have labelled MTNL Broadband, that is not the default name to be sure look at the 'Status' column it will show 'Network cable unplugged'. Double click on this entry & you will come to the following window
Double click on the last entry 'Internet Prtocol (TCP/IP)’ & you will see

In the tab 'General', the radio button 'Obtaiin an IP address automatically’ should be selected & in the next you can manually enter the DNS entries of your choice. In my case I have used OpenDNS entries.
After that is done, click on the 'Advanced' tab &
 the above window will be seen, here click on the 'DNS' tab & then click on 'Add' button to enter the remaining DNS entries (one at a time) :). After adding the remaining DNS entries click on 'Ok' on all the windows opened so far to close all of them. The DNS entries i have used are the following.
Open DNS
208.67.222.222
208.67.220.220
208.67.220.222
208.67.222.220
MTNL DNS
Mumbai
59.185.3.12
59.185.3.10
203.94.227.70
Delhi
203.94.243.70
59.185.0.23
59.185.0.50
Comodo DNS
156.154.70.22
156.154.71.22
Here are some VSNL/Tata Indicom DNS entries. All are at Mumbai.
203.197.12.42
203.197.12.30
202.54.6.60
202.54.29.5
Norton DNS
198.153.192.1 and
198.153.194.1
but since we use MTNL Triband (Mumbai) these entries will suffice.
To learn more about OpenDNS go to http://www.opendns.com/
Wednesday, April 14, 2010
How an Acer customer is treated.
I write this as a very disappointed customer. I bought an Acer AS3810TZ – 413G32N in Feb 2010 from ‘Vijay Sales’ Prabhadevi showroom Mumbai.
The first thing I did on reaching home was to try & make the ‘Restore Disc’s’. As this laptop does not have a optical drive I was talked into buying a Transcend external dvd writer by the salesman, which cost over Rs 3700/- (I later found to my shock that it was available elsewhere cheaper by a 1000 bucks) . The first writer had a fault & was replaced after 5 days (by the dealer). The next at best works in a temperamental fashion & seems to be allergic to Moser Baer dvd’s. I would like to mention that the read/write speeds for dvd’s is 8X for this or any other ext dvd writer. I frankly feel one does not need this on a regular basis. In such a case it would be better to buy an external casing (Rs 600-800) for the DVD writer of your desktop (I presume you have one) & use that when necessary. And this also offers faster speeds.
I found that after the first disc was burnt the laptop gave an error that the making of the restore disc had failed & that I should insert another disc & it started to burn the first disc all over again, this happened FOUR times that means I wasted FOUR DVD’s.
When I went to the Acer website for the toll free number I found the ‘VOLUNTARY SAFETY RECALL’ option on your website & entered the details for this laptop and found it has an issue about the microphone cable.
I used the toll free number & made a complaint on 28-2-2010 regarding & on 1-3-2010 registered the laptop as it was in the recall list.
1. The WiFi on laptop cannot connect to my Linksys WRT54G WiFi router when the SSID is not transmitted but when the SSID is transmitted it connects. I also use MAC filters. Another laptop in my house has no problem for the last two years (running Vista home basic) in connecting to the same router when SSID is hidden. MTNL requires this.
2. When adding a bluetooth device to the laptop (mobile phones) it gives an error ‘Peripheral device – No driver found’ . And the phone icon on the phone has an exclamation mark. But I can successfully send/receive files to/from my phone !!!
I got a call on 2-2-2010 from a tech support person who requested me to go to the ‘Restore’ option and restore to factory settings. Since I was taking the laptop to the dealer ‘Vijay Sales’ Prabhadevi Branch Mumbai where the Acer rep stationed there did the needful.
After Restore from the HDD was done I was shocked to find
a) The WiFi was not detected at all. Its only when I went on the net (thru the LAN cable) & used the ‘Update option’ thru ‘Device Manage’ that connectivity was restored for WiFi
b) My Bluetooth problem (see 2 above) still remains ie after the factory settings were restored I paired my phone to the laptop & got the same error but I can send & receive files between mobile phone & laptop so its not really critical.
c) I also have noticed that I cant find the s/w for starting the webcam &
d) The multi gesture feature on the touch pad (where you can move two finger in opposite directions to expand what is displayed on the screen eg: desktop icons etc) has also stopped working after the ‘System Restore’.
e) No Acer User Guides on the laptop even though there is an option in the ‘Start’ menu
I have come to the conclusion & verified by the service center later that the restore partition on the HDD is FAULTY, as after a restore the WiFi card & webcam & one feature of he touchpad could not be used, THIS IS A MANUFACTURING DEFECT.
AND more important the restore disks could not be made, 9 DVD’s have been wasted trying to do this (FOUR) by me & (FIVE by) the Acer rep at Vijay Sales , who then contacted his office & was told that the Erestore management s/w on this model is faulty !!! so I had been promised that restore disks would be delivered to me by Acer & have been asked to wait for a week.
On 5th Mar 2010 I spoke to Mr Khan about the different issues on the laptop & he requested I rang up the service center today and fixed an appointment for 6-Mar-2010 but later they were kind enough to call back & cancel that appointment as they have to get that cable from Acer. I was told they would call me to fix the next appointment
On 15th I took the laptop to the service center & they fixed the problem about the webcam, touchpad & bluetooth. I was told that the microphone cable did not need replacement. (Only time will tell whether I am being cheated on this). Regarding the WiFi problem I was informed that they would escalate this problem with Acer & I would be contacted as soon as the solution is found. So currently only thing pending currently is the WiFi problem & the disc.
On the 19th Mar 2010 after getting back the laptop I dropped in at the dealer to check with the Acer rep there, if the restore disc’s were ready. At this time I spoke to the Sales Manager who then promised me the OS disc (Win 7 Home Premium 64 bit) specifically meant for this laptop. (I was pleasantly surprised by this little did I realize that its all BS). Please note I was first promised the disc’s on 2nd of Mar 2010 & there had been no movement on this.
On 23rd I rang up Sales Manager told me that he had started the process for getting the OS disc for my laptop, which had to come from Microsoft Bangalore.
On 30th Mar 2010 I sent the Sales Manager an email & got a reply that it would probably be ready in another week. Acer seems fascinated by the figure 7, everything will be ready in a week’s (7 days) time.
On the 1st Apr 2010 I got an email from another Acer staff that I could collect the CD from their office and the same would be available with the security by the name of Mr Sachin.
On 2nd Apr 2010 I went to the Acer Mumbai office and found it closed & there was no security present. I rang up the Sales Manager and was promised that the CD would be delivered to my house after reaching home the same day I emailed him my postal address.
On 6th Apr 2010 and there is still no sign of the promised OS CD containing Win 7 Home Premium 64 bit. I was not aware that Acer plays ‘April Fool’ jokes on its customers. Since there was no sign of any disc I called up the Mumbai office & was told that the ‘OS disc’ would be delivered tomorrow. I even asked the person who spoke to me if it was actually the OS disc & was told very emphatically ‘Yes Sir, it is the OS disc’
On 7- Apr 2010 I get the delivery of THREE disc’s & was stunned to find it’s the ‘Recovery Disc’s’ which were promised initially (2nd Mar2010) AND NOT THE ‘OS DISC’ which should mean the OPERATING SYSTEM DISC. ON CALLING the Sales Manager I told him I feel totally cheated that initially (2nd Mar2010) I was promised the (‘Recovery Disc’s) then on 19th Apr 2010 I was promised the OS disc. He got back to me with another staff member (in a con call) who tried to explain to me its only THREE disc’s but when I explained to him that the 4th disc contains ONLY the drivers and the situations where that could be useful. He promised to get me that by 12th Apr 2010. He had no answer why I was first promised the recovery disc & then the OS disc. It’s become very clear to me now that either the people who work in this company don’t know the difference between ‘recovery disc’s’ & ‘OS disc’s’ or worse.
On 12th Apr 2010 the driver disc was also delivered in FOUR working days flat. I wonder what took the other three disc so long to be delivered?
When I mentioned this to my friend he jokingly said his fruit/vegetable vendor on the road knows what he sells right down to where he sources his stock. Another quipped that his butcher knows his customer by community & when they avoid meat.
Another experience with Acer tech support is that the calls from Acer Delhi are at best a comedy of errors but cut a very sorry figure with the customer. I have got calls from a lady who claimed to be from the ‘feedback dept’ asking me if the ‘problem of the laptop battery’ was solved. I had never made any complaint of the laptop battery. On another day I got another from a lady asking me if the problem of ‘overheating laptop’ was solved. I wonder if they had a premonition of things to come! There seems to be some communication problem in your organization.
When such calls are made I have to waste a lot of time telling them the whole litany of problems. As always these people promise that someone will get back to me about my problems, a promise that has NEVER been kept.
Now the only thing that is pending is the why the WiFi cannot connect if the SSID is hidden. I have been promised that I will be contacted once a solution is found but I really don’t have much faith in these guys anymore.
I had even posted the WiFi problem on the Microsoft & Intel site but to no avail. Check oout the post & their replies.
http://social.answers.microsoft.com/Forums/en-US/w7network/thread/db0684f0-db3a-47b6-813b-e846fd0ef7b0
http://communities.intel.com/message/88147#88147
Moral of this story (comes with hindsight)
The first thing I did on reaching home was to try & make the ‘Restore Disc’s’. As this laptop does not have a optical drive I was talked into buying a Transcend external dvd writer by the salesman, which cost over Rs 3700/- (I later found to my shock that it was available elsewhere cheaper by a 1000 bucks)
I found that after the first disc was burnt the laptop gave an error that the making of the restore disc had failed & that I should insert another disc & it started to burn the first disc all over again, this happened FOUR times that means I wasted FOUR DVD’s.
When I went to the Acer website for the toll free number I found the ‘VOLUNTARY SAFETY RECALL’ option on your website & entered the details for this laptop and found it has an issue about the microphone cable.
I used the toll free number & made a complaint on 28-2-2010 regarding & on 1-3-2010 registered the laptop as it was in the recall list.
1. The WiFi on laptop cannot connect to my Linksys WRT54G WiFi router when the SSID is not transmitted but when the SSID is transmitted it connects. I also use MAC filters. Another laptop in my house has no problem for the last two years (running Vista home basic) in connecting to the same router when SSID is hidden. MTNL requires this.
2. When adding a bluetooth device to the laptop (mobile phones) it gives an error ‘Peripheral device – No driver found’ . And the phone icon on the phone has an exclamation mark. But I can successfully send/receive files to/from my phone !!!
I got a call on 2-2-2010 from a tech support person who requested me to go to the ‘Restore’ option and restore to factory settings. Since I was taking the laptop to the dealer ‘Vijay Sales’ Prabhadevi Branch Mumbai where the Acer rep stationed there did the needful.
After Restore from the HDD was done I was shocked to find
a) The WiFi was not detected at all. Its only when I went on the net (thru the LAN cable) & used the ‘Update option’ thru ‘Device Manage’ that connectivity was restored for WiFi
b) My Bluetooth problem (see 2 above) still remains ie after the factory settings were restored I paired my phone to the laptop & got the same error but I can send & receive files between mobile phone & laptop so its not really critical.
c) I also have noticed that I cant find the s/w for starting the webcam &
d) The multi gesture feature on the touch pad (where you can move two finger in opposite directions to expand what is displayed on the screen eg: desktop icons etc) has also stopped working after the ‘System Restore’.
e) No Acer User Guides on the laptop even though there is an option in the ‘Start’ menu
I have come to the conclusion & verified by the service center later that the restore partition on the HDD is FAULTY, as after a restore the WiFi card & webcam & one feature of he touchpad could not be used, THIS IS A MANUFACTURING DEFECT.
AND more important the restore disks could not be made, 9 DVD’s have been wasted trying to do this (FOUR) by me & (FIVE by) the Acer rep at Vijay Sales
On 5th Mar 2010 I spoke to Mr Khan about the different issues on the laptop & he requested I rang up the service center today and fixed an appointment for 6-Mar-2010 but later they were kind enough to call back & cancel that appointment as they have to get that cable from Acer. I was told they would call me to fix the next appointment
On 15th I took the laptop to the service center & they fixed the problem about the webcam, touchpad & bluetooth. I was told that the microphone cable did not need replacement. (Only time will tell whether I am being cheated on this). Regarding the WiFi problem I was informed that they would escalate this problem with Acer & I would be contacted as soon as the solution is found. So currently only thing pending currently is the WiFi problem & the disc.
On the 19th Mar 2010 after getting back the laptop I dropped in at the dealer to check with the Acer rep there, if the restore disc’s were ready. At this time I spoke to the Sales Manager who then promised me the OS disc (Win 7 Home Premium 64 bit) specifically meant for this laptop. (I was pleasantly surprised by this little did I realize that its all BS). Please note I was first promised the disc’s on 2nd of Mar 2010 & there had been no movement on this.
On 23rd I rang up Sales Manager told me that he had started the process for getting the OS disc for my laptop, which had to come from Microsoft Bangalore.
On 30th Mar 2010 I sent the Sales Manager an email & got a reply that it would probably be ready in another week. Acer seems fascinated by the figure 7, everything will be ready in a week’s (7 days) time.
On the 1st Apr 2010 I got an email from another Acer staff that I could collect the CD from their office and the same would be available with the security by the name of Mr Sachin.
On 2nd Apr 2010 I went to the Acer Mumbai office and found it closed & there was no security present. I rang up the Sales Manager and was promised that the CD would be delivered to my house after reaching home the same day I emailed him my postal address.
On 6th Apr 2010 and there is still no sign of the promised OS CD containing Win 7 Home Premium 64 bit. I was not aware that Acer plays ‘April Fool’ jokes on its customers. Since there was no sign of any disc I called up the Mumbai office & was told that the ‘OS disc’ would be delivered tomorrow. I even asked the person who spoke to me if it was actually the OS disc & was told very emphatically ‘Yes Sir, it is the OS disc’
On 7- Apr 2010 I get the delivery of THREE disc’s & was stunned to find it’s the ‘Recovery Disc’s’ which were promised initially (2nd Mar2010) AND NOT THE ‘OS DISC’ which should mean the OPERATING SYSTEM DISC. ON CALLING the Sales Manager I told him I feel totally cheated that initially (2nd Mar2010) I was promised the (‘Recovery Disc’s) then on 19th Apr 2010 I was promised the OS disc. He got back to me with another staff member (in a con call) who tried to explain to me its only THREE disc’s but when I explained to him that the 4th disc contains ONLY the drivers and the situations where that could be useful. He promised to get me that by 12th Apr 2010. He had no answer why I was first promised the recovery disc & then the OS disc. It’s become very clear to me now that either the people who work in this company don’t know the difference between ‘recovery disc’s’ & ‘OS disc’s’ or worse.
On 12th Apr 2010 the driver disc was also delivered in FOUR working days flat. I wonder what took the other three disc so long to be delivered?
When I mentioned this to my friend he jokingly said his fruit/vegetable vendor on the road knows what he sells right down to where he sources his stock. Another quipped that his butcher knows his customer by community & when they avoid meat.
Another experience with Acer tech support is that the calls from Acer Delhi are at best a comedy of errors but cut a very sorry figure with the customer. I have got calls from a lady who claimed to be from the ‘feedback dept’ asking me if the ‘problem of the laptop battery’ was solved. I had never made any complaint of the laptop battery. On another day I got another from a lady asking me if the problem of ‘overheating laptop’ was solved. I wonder if they had a premonition of things to come! There seems to be some communication problem in your organization.
When such calls are made I have to waste a lot of time telling them the whole litany of problems. As always these people promise that someone will get back to me about my problems, a promise that has NEVER been kept.
Now the only thing that is pending is the why the WiFi cannot connect if the SSID is hidden. I have been promised that I will be contacted once a solution is found but I really don’t have much faith in these guys anymore.
I had even posted the WiFi problem on the Microsoft & Intel site but to no avail. Check oout the post & their replies.
http://social.answers.microsoft.com/Forums/en-US/w7network/thread/db0684f0-db3a-47b6-813b-e846fd0ef7b0
http://communities.intel.com/message/88147#88147
Moral of this story (comes with hindsight)
- Avoid this dealer
- Think twice about exchange offers. If you still want to explore this option then,
- Check out the company website if there is a recall for the particular model you are interested in.
- If something is wrong with the product DON’T be soft spoken/polite, you will be taken for a ride.
- Insist on a replacement as most dealers have a 1-week period when you can return faulty products. I didn’t know this then. they will sweet talk you into 'we will have this fixed very soon crap'. Don't fall for it.
- For quick results when you have spoken to all also mention that you will be writing to the MD/CEO with your feedback. Incidentally this post is a abridged version of just that.
- Better still avoid this manufacturer.
Subscribe to:
Posts (Atom)