This article is on how to configure Linksys WRT54G wireless router to be used in conjunction with D-Link DSL 502T, ADSL2+ broadband router/modem, which is used by MTNL & BSNL broadband thru telephone wire in India. The firmware currently on this router is 7.00.1. On how to configure the D-Link 502T model go to
 WiFi Security

Click on the ‘Enable button’ and on the ‘Permit button’ & click on the ‘Edit MAC filter list’ and add the MAC address also called ‘Physical address’
 In the ‘Security tab’ select 1, 2 & 4 check boxes.(See below). Click on ‘Save Settings’


 PS Remember that now to access the router thru the browser the address is 10.10.0.1 and NOT the one you will find in the user guides (192.168.1.1). And to access the D-Link 502T thru browser you type 192.168.1.1. Happy surfing.The figure you see below is the DNS settings on my desktop & laptop and are relevant to MTNL
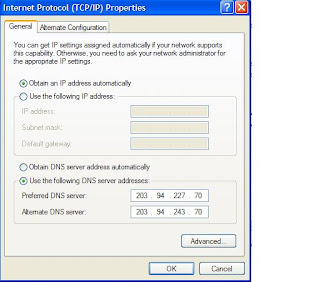
For those who want their laptops & Desktops connected thru the Linksys WRT54G to share files/folders/drives check out http://socrates0.blogspot.com/2008/01/sharing-filesfolders-across-machines.html
For more info on WPA2 on Win XP check out
http://www.microsoft.com/windowsxp/using/networking/security/wireless.mspx
&
http://www.microsoft.com/windowsxp/using/security/expert/bowman_wirelesssecurity.mspx
http://socrates0.blogspot.com/2006/01/configuring-d-link-502t-router-for.html I have used PPPoE on the D-Link 502T (not bridge mode) & DHCP on the Linksys router. Also I have not focused on how the laptop detects the network. I have presumed that you know your laptop better than the Linksys WRT54G wireless router :)
The IP address of both these gadgets is 192.168.1.1 & so will create a problem while configuring thru the CD given with the Linksys machine. So I suggest don’t waste time on it like I did. Except for Norton firewall & vaccine (60 day trial version), if you need it and the quick installation guide.
First on how to connect the all the equipment (if you already downloaded the manual then you can ignore this part and refer to the manual for the connecting the hardware & then go straight to part 2..
PART 1
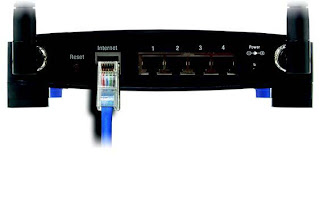
1) First disconnect the RJ 45 wire connected to your desktop Ethernet card coming from the D-Link 502T and connect this wire to the ‘Internet’ port on the WRT54G router as seen below.
as seen in the picture above. So now there is a connection from your D-Link 502T to the ‘Internet’ port of your Linksys router.
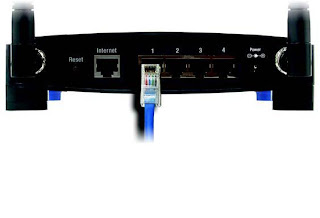
2) Next use the RJ45 wire, which came in the Linksys box & connect one end to the Ethernet card of your desktop (which was just vacated by the other wire) and the other end to any of the ports numbered 1 to 4. I have connected to port 1 as shown in the picture below.
3) Connect the power adapter pin in the power socket as seen below

PART 2
So much for the hardware connections. Power up the Linksys router & Desktop computer ONLY . Now lets get to the basic configuration of the Linksys wireless router.
This is how I have done it successfully, so you can too. :)
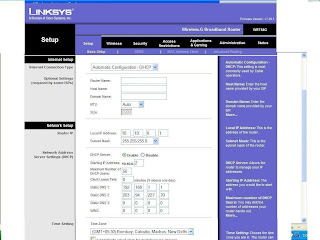
Open IE6/IE7 browser and type 192.168.1.1, a window will pop up & ask for username & password. Default username is blank & default password is ‘admin’ after which you will come to the screen as seen below
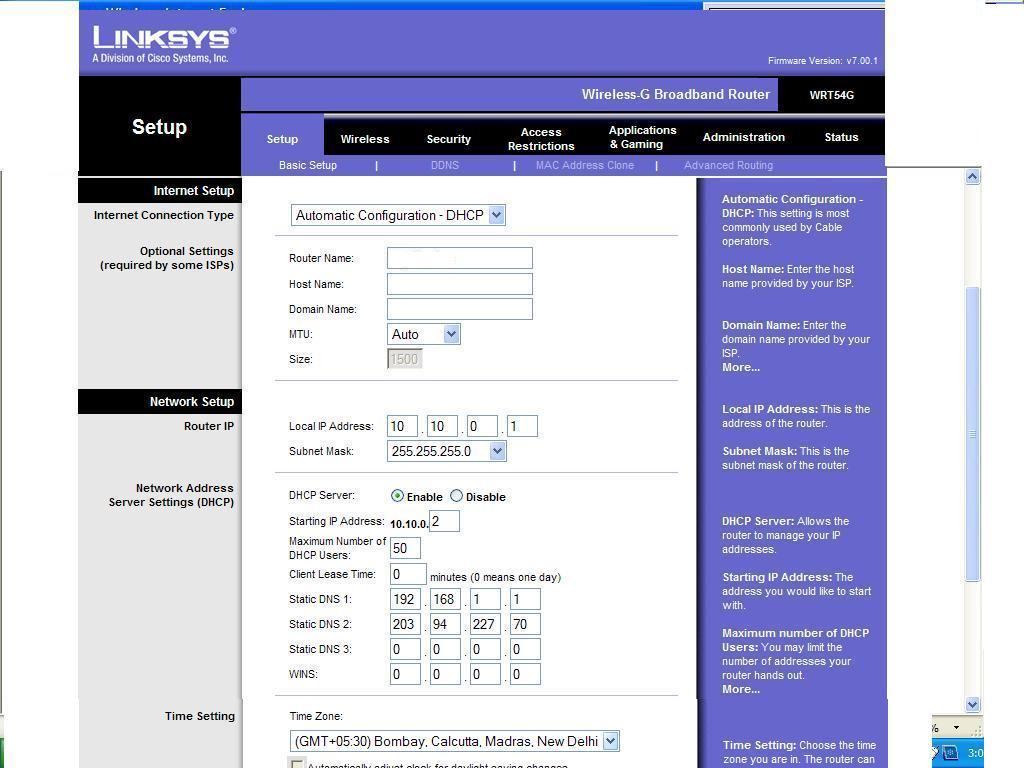
‘Internet Connection Type’ is by default ‘Automatic configuration DHCP’ leave it as it is J (I did not which caused me a lot of grief J )
In ‘Router Name’ enter a name of your choice.
Let MTU be ‘Auto’.
At ‘Local IP Address’ enter 10.10.0.1
‘Subnet Mask’ 255.255.255.0
‘DHCP’ is ‘enable’
‘Starting IP address’ leave it as it is, this will be changed later.
‘Static DNS 1’ 192.168.1.1
‘Static DNS 2’ 203.94.227.70
‘Time Zone’ change it to relevant location.
Click on the 'Save' button.
At this point you will loose contact with the wireless router thru the browser. Double click on the computer icon in your task bar & go to the ‘Support’ tab and see the IP taken automatically by the machine most probably 10.10.0.2. Now type 10.10.0.1 in the browser location bar to gain access on the config page of the router & change (see above) the ‘Starting IP address’ to 10.10.0.2. click on ‘Save’
Next click on the ‘Wireless’ tab give a name to your network also called SSID, remember all wireless machines on this network should have the same SSID ie network name & select what wireless network mode you need. If you have only laptops, which operate in the, 802.11g mode, (most new machines) then select ‘G Only’. Click on ‘Save Settings’.
Now switch on the D-Link 502T (the Linksys WRT 54G & Desktop are already switched on) and after the lights become steady, on the desktop click on ‘Start’ button -> ‘Run’ & type ping 192.168.1.1. If you get ‘timed out’ message, then there is some error, so go over all points above to see if you have missed anything. If you see a reply like the pic below all is well.
 WiFi Security
You should be able to access the Internet on your desktop. Hurray So far so good, J remember that your network is still unsecured and we still have to configure the security settings etc.
You can now turn to your wireless PC or laptop to connect it to the wireless network. Here I am assuming your laptop has a built in WiFi card, if you are using an adaptor then follow the instructions of the adaptor maker. XP has a very user-friendly wireless networking utility. If you’re setting up a network for the first time, use the Windows Wireless Network Setup Wizard, in the Control Panel. This copies configuration info to a USB flash drive that you can insert into each additional PC or device. If you use Vista (like me) it’s just as easy going thru the Control Panel for first time users. After you have gone thru the setup wizard and it has recognized the network with the name you had previously given it, now you should be able to access the Internet.
Leave the laptop on for the time being and lets focus our attention on the router configuration thru the browser of the desktop.
Click on the ‘Wireless tab & then on ‘Wireless MAC filter’ (on how to find the MAC address of your wireless machine go to right to the bottom of this page) tab as seen below

Click on the ‘Enable button’ and on the ‘Permit button’ & click on the ‘Edit MAC filter list’ and add the MAC address also called ‘Physical address’

Click on ‘Save Settings’ in both windows.
Next click on the ‘Wireless’ tab -> ‘Wireless Security’ tab and select the appropriate settings (AES, TKIP or AES+TKIP) depending on what your laptop supports. Remember that WPA2 is considered the best as also AES+TKIP if your laptop supports it go for it. Select the same settings and password on your laptop. Click on ‘Save Settings’
 In the ‘Security tab’ select 1, 2 & 4 check boxes.(See below). Click on ‘Save Settings’
At the ‘Administration’ tab -> Management change the routers password.

Also select the check box ‘HTTPS’. Click on ‘Save Settings’
After you have made all the relevant then go to the ‘Administration’ tab – ‘Config Management’ and take a back up of your settings. This can be done at a later stage too when you have made all the changes you need. PS Remember that now to access the router thru the browser the address is 10.10.0.1 and NOT the one you will find in the user guides (192.168.1.1). And to access the D-Link 502T thru browser you type 192.168.1.1. Happy surfing.The figure you see below is the DNS settings on my desktop & laptop and are relevant to MTNL
Finding the MAC Address and IP Address for Your Ethernet Adapter
Windows 2000 or XP
1. Click Start and Run. In the Open field, enter cmd. Press the Enter key or click the OK button.
2. At the command prompt, enter ipconfig /all. Then press the Enter key.
3. Write down the Physical Address as shown on your computer screen. It is the MAC address for your Ethernet adapter. This appears as a series of numbers and letters.
The MAC address/Physical Address is what you will use for MAC address cloning or MAC filtering. Note: The MAC address is also called the Physical Address.
Windows Vista
- Click Start -> Accessories -> Command prompt
- At the command prompt, enter ipconfig /all. Then press the Enter key.
For those who want their laptops & Desktops connected thru the Linksys WRT54G to share files/folders/drives check out http://socrates0.blogspot.com/2008/01/sharing-filesfolders-across-machines.html
For more info on WPA2 on Win XP check out
http://www.microsoft.com/windowsxp/using/networking/security/wireless.mspx
&
http://www.microsoft.com/windowsxp/using/security/expert/bowman_wirelesssecurity.mspx
Recently I came across two sites which generate random passwords
https://www.grc.com/passwords.htm
https://secure.pctools.com/guides/password/
The first is an online generator whereas the second is a s/w to be installed on your machine to do the needful. When you use a password 63 or 64 characters long copy paste it in your WiFi router then save the password in ‘Notepad’, then transfer this password to a pendrive & paste it in your laptops.