Wednesday, November 09, 2011
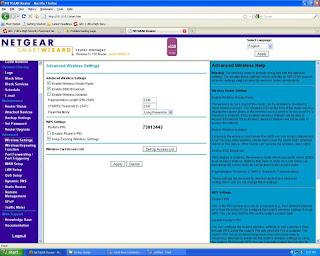
How do I check the WLAN MAC address of a Nokia phone?
Sunday, January 30, 2011
How to configure Netgear Wireless N150 model WGR614 wireless router
Before you install your wireless router, make sure that the Internet Protocol (TCP/IP) Property settings on your computer are set to “Obtain an IP address automatically ” using DHCP and for DNS settings "Use the following DNS server address' where you can enter the DNS address of your choice. You can check these settings by looking at the TCP/IP Properties of your Internal Network Connections, which are accessible through the Control Panel of your computer.
1. Turn off your computer.
2. Turn off and unplug the broadband modem.
3. Locate the cable (A) that connects your computer to the modem.
4. Disconnect the cable at the modem end only (B). You will connect it to the router later.
5. Locate the Ethernet cable that came with your NETGEAR product. insert one end of this Internet cable (See below) into your modem (C) and the other end into the Internet port of the wireless router (D). (The cable and the Internet port label are color coded.)
6. Locate the cable (A) that is still attached to your computer (see below). Insert that cable into any one port (1-4) on the router, such as port 4 (E), as shown in figure below.
7. Connect any additional wired computer to your router by inserting an Ethernet cable from one of these computers into one of the three remaining LAN ports.
8. Review that your network is now set up (as seen below); you are ready to start your network.
9. Start your network in the correct sequence, as mentioned below.
So much for the hardware connections. Power up the Netgear WiFi router & desktop computer. Now lets get to the basic configuration of the Netgear wireless router.
This is how I have done it successfully so you can too.
Open IE6/IE7 or Firefox browser and type 192.168.1.1, a window will pop up & ask for username & password. Default username is ‘admin’ & default password is ‘password ‘ both in lowercase letters. (For security reasons, the router has its own user name and password.) next you will come to the screen as seen below. The password can be changed later.
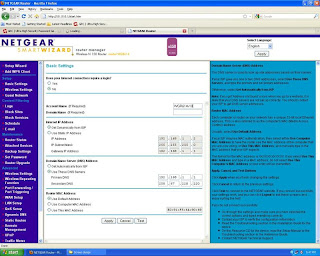
As I mentioned above the first thing we have to do is to change the IP of the wifi router as it clashes with that of the ADSL modem. For that click on the ‘LAN Setup’ on the right side tab to come to the pic seen below.
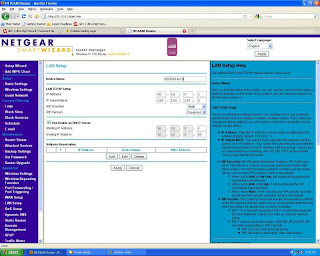
Enter a device name of your choiceIP Address: 10.10.0.1
Subnet mask: 255.255.255.0
Next two entries are left as it is
Select check box ‘Use router as DHCP server’
Starting IP Address: 10.10.0.2
Ending IP address: 10.10.0.50 (you can specify a number upto 255 but I would suggest limit this number to what ever number of device you envisage will connect to your WiFi (I normally use 5-10).
Click on ‘Apply’
At this point you will loose contact with the wireless router through the browser. Double click on the computer icon in your task bar & go to the ‘Support’ tab and see the IP taken automatically by the machine will most probably be 10.10.0.2. Now type 10.10.0.1 in the browser location bar to gain access on the configuration page of the router.
Click on ‘Setup Wizard’ in the right side tab to get the following.
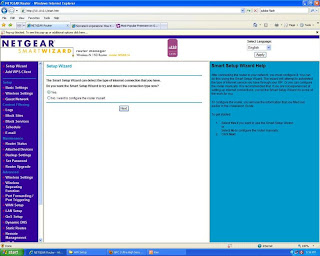
Click on ‘Yes’ & then on ‘Next’ to arrive at the pic shown below
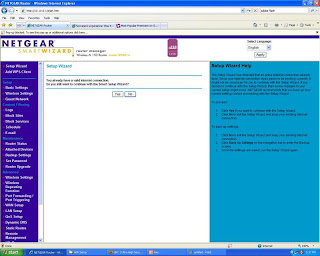
Click on ‘Yes’Now switch on the D-Link 502T and after the lights become steady, on the desktop click on ‘Start’ button -> ‘Run’ & type ping 192.168.1.1. If you get ‘timed out’ message, then there is some error, so go over all points above to see if you have missed anything. If you see a reply like the pic below all is well. You could also open another tab & try to browse the net.
You should be able to access the Internet on your desktop. Hurray So far so good, remember that your network is still unsecured and we still have to configure the security settings etc.
After that click on ‘Wireless Settings’ in the right side tab to arrive at the pic seen below
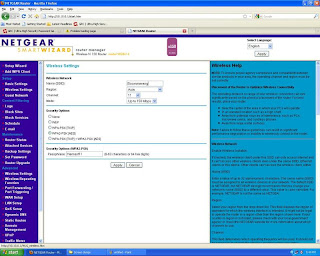
Give your network a name, the network name is also called SSID next
Region: Asia
Channel: 11
Mode: upto 150Mbps (there are three modes ‘upto 54 Mbps’ ie ‘g’, ‘upto 75 Mbps’ ie ‘b’ or ‘g’, ‘upto 150Mbps’ ie ‘n’).
In
Security Options: WPA2 PSK (AES) currently considered the best, below that enter the
Passphrase: (I enter a 63 character password)
Click on ‘Apply’
See
https://www.grc.com/passwords.htm
https://secure.pctools.com/guides/password/ for password generation.
You can now turn to your wireless PC or laptop to connect it to the wireless network. Here I am assuming your laptop has a built in WiFi card, if you are using an adaptor then follow the instructions of the adaptor maker. XP has a very user-friendly wireless networking utility. If you’re setting up a network for the first time, use the Windows Wireless Network Setup Wizard, in the Control Panel. This copies configuration info to a USB flash drive that you can insert into each additional PC or device. If you use Vista/Win 7 (like me) it’s just as easy going thru the Control Panel for first time users. After you have gone thru the setup wizard and it has recognized the network with the name you had previously given it, enter the password where asked (When you use a password 63 or 64 characters long copy paste it in your WiFi router then save the password in ‘Notepad’, then transfer this password to a pendrive & paste it in your laptops.) now you should be able to access the Internet. So far so good but not quite good enough. We now have to set up the MAC filters.
In the right side tab go to ‘Advanced’->’Wireless Settings’
Enable ‘Wireless Router Radio’ & ‘Enable SSID Brooadcast’ & ‘Keep Existing Wireless Settings'’ Then click on the button ‘Set up Access List’ to get the pic seen below.
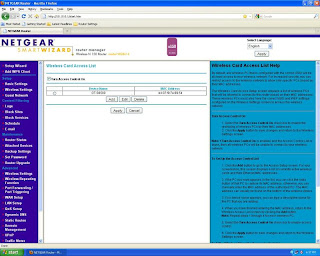
Click on ‘Turn Access Control On’.
Here you will see the gadgets that are connected to your WiFI network..
Click on ‘Add’ & enter the name & MAC address of the device.
Select the relevant radio buttons.
Click on ‘Apply’
PS Remember that now to access the router thru the browser the address is 10.10.0.1 and NOT the one you will find in the user guides (192.168.1.1). And to access the D-Link 502T thru browser you type 192.168.1.1. Happy surfing.
To find the MAC address of your computer go to http://socrates0.blogspot.com/2007/12/how-to-configure-linksys-wrt54g.html for your Samsung Wave GT-S8500. see below
Open menu in you Samsung Wave
Then open “Settings”.
Scroll down to open “About Phone"
Once you open “About Phone”, go to “System Info"
then open “System Info” & in tab named “Device” you will get the MAC address .
A few useful sites are mentioned below.
http://www.whatismyip.com/
http://downforeveryoneorjustme.com/
http://www.dslreports.com/tweaks
https://www.opendns.com/
http://speedtest.net/
http://pingtest.net/
http://airtel.in/speedcheck
Friday, December 03, 2010
Changing your Firefox default keyword search
Sunday, October 10, 2010
Email Merge thru Thunderbird
This is a tutorial to use the email merge thru Thunderbird 3.1.4 or later (Can be found here http://www.mozillamessaging.com/en-US/thunderbird/ ). I have also used the add-on called 'MailMerge'.
First install the latest ver of Thunderbird & configure the email a/c. (I have not included the instructions here). Then install the add-on found here -> https://addons.mozilla.org/en-US/thunderbird/addon/47144/
'MailMerge' is a Thunderbird extension designed by Alexander Bergmann. The Mail Merge extension is compatible with the latest Thunderbird 3.0.* releases, and is cross-platform. It supports two features, dubbed Mass Mail and Personal Mail.
'Mass Mail' allows you to create a draft email, put your intended recipients in the To:, CC:, and BCC: fields, then automatically split the draft into a set of identical copies with one addressed to each recipient. This is all done without special preparation beforehand; the extension adds a button labeled Mass Mail to the toolbar; you compose your mail as usual, then click on Mass Mail to perform the split.
The 'Personal Mail' feature is far more like a traditional paper mail-merge. You create a message template, with control codes in place of the fields you wish to include, then link the template to a comma-separated-value file (CSV) populated with your intended recipients. The control characters use double braces, and you can define any fields you want — just place their field names in the first line of the CSV. You will probably only use the recipient’s name and email address, so your template might just include {{name}} and {{email_address}}, but you could include other information from your address book in the body of the message if you need to.
Close Thunderbird for now.
Now lets get down to preparing the database containing the fields that you will use in the email that is going to be sent to 'X' number of people. As you will see in the fig. Below I have made columns with the title
'Salutations' which will contain 'Dear', 'Mr', 'Ms', 'Maam', 'Pachi' etc
'Fname' will contain the First Name of the recipient.
'Lname' will contain the Last Name of the recipient.
'EmailID' will contain the Email ID of the recipient.
After giving the column headings save the file as a .CSV file (Comma Seperated Values). Now fill in the details of all the recipients. This file can be opened in Microsoft Office or in OpenOffice. You can add other details if required taking care to give a column name which is indicative of its contents.
Now open Thunderbird click on 'Write' as seen below
In this window as seen below I have specified the column headings enclosed in double braces. For the recipients its {{EmailID}}. ie: In the 'To' type {{EmailID}}When the email is sent the email ids from this column in your database will occupy this space & that is what the recipients will see at his end.
Now you can type out the contents of the email & can be addressed as seen in the figure below, ofcourse you can format it in anyway. Some examples are
Eg 1:
To,
Dear {{Fname}} {{Salutations}} which will appear as
To,
Dear Shailesh Maam to the recipient
Eg 2:
To,
Dear {{Fname}} {{Lname}} which will appear as
To,
Dear Shailesh Parab to the recipient
You can try out any permutation and combination but remember that if you have a column in your database, you can place its contents in your email at a location of your choice.
Now to send the email click on 'File' in the Menu bar (seen below) & then click on 'Personal Mail'
you will get a window which looks like this (see below)
In this window you will have to click on 'Browse' push button to select the file which contains your database. If your database is small then leave other entries as you see them & then click on 'Ok'. But if your database is large I would suggest that you specify the 'Start' & 'Stop' containing the record numbers to limit the output of emails being sent at any given time.
One drawback of this add on, ver 1.3.1 working with Thunderbird ver 3.1.4, is it does not allow embedded pictures to be transmitted. Hopefully this will be rectified in future versions.
Saturday, October 09, 2010
Setup instructions for MyPhoneExplorer for Samsung Galaxy S
Samsung Galaxy S is also called i9000 on the Samsung website http://www.samsung.com/in/consumer/mobile-phone/mobile-phone/touch-phone/GT-I9000HKAINU/index.idx?pagetype=prd_detail&returnurl=
If you start MyPhoneExplorer ver 1.8.0 & click on ‘File’->’Settings’->’Phone with Google Andriod OS’ & then take the mouse pointer to ‘Sample’ next to it you will see that Samsung i9000 is mentioned in it which is the nomenclature for Samsumg Galaxy S. so this phone is compatible with this s/w. Also mentioned here http://www.fjsoft.at/forum/viewtopic.php?t=8965&sid=bd29b3f5949597ab220c86627645474a
You have to remember two things here in this setup
1) If you want to connect via cable or by Bluetooth the settings will be different & you will have to reconfigure separately for each type of connection.
2) If you are connecting thru USB cable AND you happen to connect thru different USB port then your configuration will change & you will have to come to this section of ‘Setting’ to click again on the push button ‘Search for Device’.
Before starting I suggest that backups be made of important data on your phone also remember that 'Andriod' is still 'Work-In-Progress' . :) Now lets get to the setup. Close the s/w & connect the USB cable (or bluetooth dongle) & then start the s/w, you should see some balloons popping up in your task bar, let that process go on.
Click on ‘File’->’Settings’ then click on 'Connection' (seen in the left pane). (See below).
Click on ’Phone with Google Andriod OS’.
‘OBEX packet size’ should be ‘Autodetect’.
Select ‘Write log file’.
Remember that the COM port number & Baud rate number seen in the figure below maybe different from what you see in the s/w on your machine, do not change it.
At this point DO NOT CLICK ON 'Search for Device'. That will be done last when all selections are done. (Page 6)
Now make the selection as seen in the following picture.
Next click on ‘Startup’ in the left pane & the following window will be seen.
Next click on ‘Appearance’ in the left pane & the following window will be seen. Here you can change the 'Font' & 'First Day of the Week'
Next click on ‘Behaviour' in the left pane & the following window will be seen.
Next click on ‘Sync’ in the left pane & the following window will be seen.
As seen the picture immediately above 'Only MyPhoneExplorer' is selected, as syncronisation is being inside this s/w itself in case you want to sync with another s/w like MS Outlook, MS Outlook Express, Thunderbird, Windows Live Mail etc (depending on whether any of the above mentioned is installed on your computer), you will have to make the appropiate selection in 'Contacts', 'Calender', 'Notes' seen in picture above. Also the correct 'Sync protocol' should be selected. 'SyncML' is usually the universal standard but you might have to experiment here as the 'User Guide' is silent on this maybe the forum can help !!!
Next click on ‘Multi-Sync’ in the left pane & the following window will be seen.
Next click on ‘Advanced 1’ in the left pane & the following window will be seen.
Next click on ‘Advanced 2’ in the left pane & the following window will be seen. Here you can change the location of 'Photo Sync' folder (where photos are stored) & location of your database. Its preferable to keep them on a drive other than C:\ where the computer OS is stored.
After making all the selections as seen in the figures above are done, lets go back to 'Connection' again.
Click on ‘Search for device’. It should usually detect your phone without any problems, IN CASE it does not then you should play around with the ‘COM port’ selection depending on which USB port you have connected to & ‘baud rate’ to get it going. If it still does not, then post your problem on the forum (link given below) to get an answer from the developer.
Hope this helps :)
Forum for this s/w & can be useful in future for further reading about any bugs, shortcomings etc. They can be directly communicated to the developer for remedies.
http://www.fjsoft.at/forum/viewforum.php?f=6&sid=31449d2cff846bbedbf6d47708a2b32b
After this done I suggest you take a 'Backup' by clicking on 'Extras' in the Menu bar & then clicking on 'Create Backup' before exploring any further :)
Saturday, July 17, 2010
How to change password of MTNL Broadband Account
- one on the MTNL Server and the
- other on the MTNL Broadband Modem set-up.
-->
This is the web interface of Broadband Modem.
Wednesday, June 16, 2010
Updating a laptop with Win XP to support WPA2 WiFi security
Tuesday, June 15, 2010
How to configure Linksys WRT 120N wireless router
connect his laptop with Win XP SP2 to the Internet. He was not sure if his laptop could support WPA2 PSK. Since his laptop was an Acer Travelmate 4152 NLCi, I went to the Acer website & had to search if it did. I finally found out that his laptop had a Intel(R) PRO/Wireless 2200BG Network.My friend had bought a Linksys WRT120N WiFi router for his home use, after setting up his network I was shocked to find that his laptop which connected so easily to the internet, at my place thru a Linksys WRT54G router was unable to do so thru this new router. And the strange thing was that another (office) laptop was able to do so !!!! After trawling the Internet for info on this problem I found the solution, that the firmware on the router could be the culprit. I noticed that the firmware ver on the WiFi router was ver 1.0 & that there had been FOUR ver updates till the time of purchase of the router (shows what old junk Croma is selling). The firmware on the router would have to be updated to the current ver which is 1.0.04 dated 15th Oct, 2009 & is 1.19MB in size the release notes state that it has a compatibility issue with the Intel(R) PRO/Wireless 2200BG Network card which has been resolved.
‘Product: WRT120N v1Classification: Firmware Release HistoryRelease Date: Oct 15, 2009
Last Firmware Version: 1.0.04_____________________________________________________________________
General Notes: - Disconnect all wireless clients from the router during the upgrade process. Make sure no wireless clients attempt to associate with the router until the upgrade process is complete.
Firmware 1.0.04 (Build 02)- Resolve connectivity issue with Intel Centrino 2200BG - Resolve issue with Home Network Defender trial period gets activated as soon as the router is connected to the Internet’
Setting up the Linksys WRT 120N is the same as Linksys WRT54G http://socrates0.blogspot.com/2007/12/how-to-configure-linksys-wrt54g.html,
except that in the tab ‘Wireless’ -> ‘Wireless Network Mode’. From this drop-down menu, you can select the wireless standards running on your network. If you have Wireless-N, Wireless-G, and Wireless-B devices in your network, keep the default, Mixed. If you have only
Wireless-G and Wireless-B devices in your network, select BG-Mixed. If you have only Wireless-N devices, select Wireless-N Only. If you have only Wireless-G devices,
select Wireless-G Only. If you have only Wireless-B devices, select Wireless-B Only. If you do not have any wireless devices in your network, select Disabled.
Else everything remains the same.
A few other useful sites are mentioned below.
http://www.whatismyip.com
http://downforeveryoneorjustme.com
http://www.dslreports.com/tweaks
https://www.opendns.com
http://speedtest.net
http://pingtest.net
http://airtel.in/speedcheck
Monday, May 31, 2010
How to enter DNS setting on your computer
This article was written for a relative who uses an Acer laptop & needed help on manually entering DNS settings.The task bar will have one/two icons like the one pointed out above, one will be for the LAN wire & the second will be for the WiFi. The method shown here for entering DNS settings is valid for both.
When you double click on this icon shown above you will come to a window, which should look like this
Double click on the last entry 'Internet Prtocol (TCP/IP)’ & you will see
In the tab 'General', the radio button 'Obtaiin an IP address automatically’ should be selected & in the next you can manually enter the DNS entries of your choice. In my case I have used OpenDNS entries.
After that is done, click on the 'Advanced' tab &
Open DNS
208.67.222.222
208.67.220.220
208.67.220.222
208.67.222.220
MTNL DNS
Mumbai
59.185.3.12
59.185.3.10
203.94.227.70
Delhi
203.94.243.70
59.185.0.23
59.185.0.50
Comodo DNS
156.154.70.22
156.154.71.22
Here are some VSNL/Tata Indicom DNS entries. All are at Mumbai.
203.197.12.42
203.197.12.30
202.54.6.60
202.54.29.5
Norton DNS
198.153.192.1 and
198.153.194.1
but since we use MTNL Triband (Mumbai) these entries will suffice.
To learn more about OpenDNS go to http://www.opendns.com/